Spread the food on your table. Use platters and cutting boards or make this great serving tray.
I love my DIY charcuterie board.

This is how I made it.
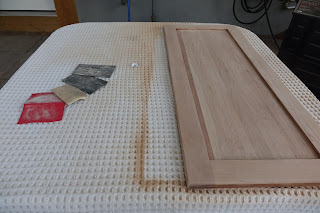
I found a solid maple wood cupboard door at the Habitat For Humanity re-store. It was $7. I found two really nice brushed stainless steel door handles at home depot. Blackboard paint came from Michael's. We had assorted sand paper and foam brushes. You will need a drill and a screw driver. I sanded the door with a palm sander, you could do this by hand if you did not have a palm sander.
My helper was eager, especially since there was a power tool involved.
Almost done. I sanded the top only and left the bottom with the original stain. Start with a fairly coarse sandpaper like this 80 grit.
I sanded the border with 80 grit only as it will be painted. The central area was subsequently sanded with 100 grit, 280 grit and 400 grit. The higher the number the finer the sandpaper. This gradual increase in grit created a very smooth surface.
Tape off the center part to protect it from the blackboard paint. If you are a very neat painter you could skip this part. I, however, am not a very neat painter.
Apply two coats of paint, waiting the recommended time in between coats. I used a foam brush that I already had to apply the paint.
When the paint has dried, measure and mark where the holes for your handles will be.
Mark the back of the board.
Use a countersinking bit so that the screws for the handles are set into the board on the back.
Use a screw driver and attach the handles to the board.
Apply mineral oil to the raw wood in the center.
Rub the oil in with a rag and let it sit for a while so that the oil can sink into the wood. More oil will need to be applied periodically, every now and then, as the wood dries and absorbs the oil.
Apply felt pads the the back of the board.
Cost breakdown of materials
cupboard door-$7
two handles-$14
blackboard paint-$7
felt pads-$6.50
Total $34.50
I already had the palm sander, sand paper, mineral oil, foam paint brush, drill and bits.
A similar tray on Etsy is selling for $135
I like it so much that I hung it on my kitchen wall. It is on display, like a piece of art.
Load it up. Use chalk to write the different kinds of meat and cheese. This tray has manchego, jarlsberg, and fontina cheeses; capacolo, genoa and proscuito meats; garlic stuffed green olives, black olives, home-made bread and butter pickles, spicy apricot jam and dijon mustard.
Some suggestions for charcuterie follow. Bon appetit!
- cupboard door
- two handles
- sand paper(variety of grit)
- palm sander
- blackboard paint
- paint brush
- painters tape
- felt pads
- drill
- countersinking bit
- regular bit
- screw driver
- mineral oil
- chalk
Basic rules for charcuterie.
1. There really are no rules. Use what ever cured meat and/or cheese you like. I like something like a salami, something like prosciutto or Serrano ham, something unusual that I haven't tried (I'm always looking for something new). Include a soft cheese like brie or boursin, a hard cheese like manchego and a stronger cheese like Stilton. Pate is also really great to include. Three types of meat and three types of cheese is sufficient.
2. Include bland crackers and/or sliced baguette. You don't want anything that is flavoured too strongly. Choose plain crackers like table water crackers. I like my bread untoasted, some people might prefer the bread brushed with olive oil and lightly toasted.
3. Include a few condiment to compliment the meat and cheese. The list is really endless but I like things like, grainy mustard, bread and butter pickles(this is a a good recipe), sour dill pickles, dilly beans, olives, pepper jelly, fig jam, chutney, fruit that is in season, dried fruit and nuts etc. You will be able to purchase most of these items from a good deli or larger grocery store or be adventuresome and make your own. Hot, sour, salty, sweet, savoury. Try to keep these components in mind when putting your charcuterie tray together. Spicy mustard, sour dill pickles, salty olives, sweet pepper jelly, and savory meat and cheese for example.
4. Let the food come to room temperature. The meat and cheese with have far better flavour at room temperature.
5. Serve with wine or beer. A match made in heaven.
6. Sit back and enjoy your company. One of the best things of all about charcuterie is that everything is put out in advance. Even the hostess can enjoy visiting with friends. See another variation below.
This tray has Genoa salami. sorano ham, country style pate, and prosciutto. Fontina, Gouda and old smoked cheddar cheese. Pickled green beans, sweet pickles, green and black olives. Fig jam and red grapes.


No comments:
Post a Comment