Showing posts with label appetizer. Show all posts

Saturday, 19 September 2015

Charcuterie Board (Meat and Cheese Platter)

Charcuterie! Charcuterie to you too! No, it's not a greeting in another language. Charcuterie(shar-koo-tuh-ree) is the French word referring to cold, cooked or cured meats. It also means a meat and cheese tray consisting of meat, cheese, pickles and preserves.  I love this super easy, tasty snack. Popular at the moment and being included on menus of trendier restaurants, charcuterie is easy to do-it-yourself. Serve as an appetizer or light meal.
Spread the food on your table. Use platters and cutting boards or make this great serving tray.
I love my DIY charcuterie board. 


This is how I made it.


I found a solid maple wood cupboard door at the Habitat For Humanity re-store. It was $7. I found two really nice brushed stainless steel door handles at home depot. Blackboard paint came from Michael's. We had assorted sand paper and foam brushes. You will need a drill and a screw driver. I sanded the door with a palm sander, you could do this by hand if you did not have a palm sander.


My helper was eager, especially since there was a power tool involved.


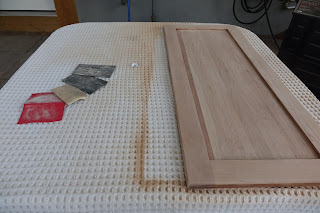
Almost done. I sanded the top only and left the bottom with the original stain. Start with a fairly coarse sandpaper like this 80 grit.


I sanded the border with 80 grit only as it will be painted. The central area was subsequently sanded with 100 grit, 280 grit and 400 grit. The higher the number the finer the sandpaper. This gradual increase in grit created a very smooth surface.


Tape off the center part to protect it from the blackboard paint. If you are a very neat painter you could skip this part. I, however, am not a very neat painter.


Apply two coats of paint, waiting the recommended time in between coats. I used a foam brush that I already had to apply the paint.


When the paint has dried, measure and mark where the holes for your handles will be.
Mark the back of the board.


Use a countersinking bit so that the screws for the handles are set into the board on the back.


Use a screw driver and attach the handles to the board.


Apply mineral oil to the raw wood in the center.


Rub the oil in with a rag and let it sit for a while so that the oil can sink into the wood. More oil will need to be applied periodically, every now and then, as the wood dries and absorbs the oil.


Apply felt pads the the back of the board.
Cost breakdown of materials
cupboard door-$7
two handles-$14
blackboard paint-$7
felt pads-$6.50
Total $34.50

I already had the palm sander, sand paper, mineral oil, foam paint brush, drill and bits.
A similar tray on Etsy is selling for $135


I like it so much that I hung it on my kitchen wall. It is on display, like a piece of art.


Load it up. Use chalk to write the different kinds of meat and cheese. This tray has manchego, jarlsberg, and fontina cheeses; capacolo, genoa and proscuito meats; garlic stuffed green olives, black olives,  home-made bread and butter pickles, spicy apricot jam and dijon mustard.

Some suggestions for charcuterie follow. Bon appetit!

Things you will need to make your own tray
  1. cupboard door
  2. two handles
  3. sand paper(variety of grit)
  4. palm sander
  5. blackboard paint
  6. paint brush
  7. painters tape
  8. felt pads
  9. drill
  10. countersinking bit
  11. regular bit
  12. screw driver
  13. mineral oil
  14. chalk


Basic rules for charcuterie.

1. There really are no rules. Use what ever cured meat and/or cheese you like. I like something like a salami, something like prosciutto or Serrano ham, something unusual that I haven't tried (I'm always looking for something new). Include a soft cheese like brie or boursin, a hard cheese like manchego and a stronger cheese like Stilton. Pate is also really great to include. Three types of meat and three types of cheese is sufficient.

2. Include bland crackers and/or sliced baguette. You don't want anything that is flavoured too strongly. Choose plain crackers like table water crackers. I like my bread untoasted, some people might prefer the bread brushed with olive oil and lightly toasted.

3. Include a few condiment to compliment the meat and cheese. The list is really endless but I like things like, grainy mustard, bread and butter pickles(this is a a good recipe), sour dill pickles, dilly beans, olives, pepper jelly, fig jam, chutney, fruit that is in season, dried fruit and nuts etc. You will be able to purchase most of these items from a good deli or larger grocery store or be adventuresome and make your own. Hot, sour, salty, sweet, savoury. Try to keep these components in mind when putting your charcuterie tray together. Spicy mustard, sour dill pickles, salty olives, sweet pepper jelly, and savory meat and cheese for example.

4. Let the food come to room temperature. The meat and cheese with have far better flavour at room temperature.

5. Serve with wine or beer. A match made in heaven.

6. Sit back and enjoy your company. One of the best things of all about charcuterie is that everything is put out in advance. Even the hostess can enjoy visiting with friends. See another variation below.


This tray has Genoa salami. sorano ham, country style pate, and prosciutto. Fontina, Gouda and old smoked cheddar cheese. Pickled green beans, sweet pickles, green and black olives. Fig jam and red grapes.

Sunday, 10 May 2015

Game day Taco Dip

Who doesn't need a tasty, quick appetizer for game day. Whether it's hockey, baseball or football this dip delivers. Serve the dip along side a big bowl of tortilla chips. It can be prepare the day before too, so the cook won't  miss any of the game.

Watch me make it on You Tube!


Start by  preparing the cream cheese base. Combine 8 ounces of cream cheese, 1 cup sour cream, zest and juice from one lime and two tablespoon of taco seasoning(find my homemade taco seasoning here). Combine well with mixer.


Spread onto the bottom of a large dish. This one is about 10 inches across.
  

Start layering. I  like tomatoes, peppers and green onions. Be sure to remove the seeds from the tomatoes, it will be too watery otherwise.


Drop spoonfuls of salsa over the veggies. I like to use homemade salsa(find the recipe here).


Top with grated cheese. I have used old, white cheddar here. You could use mozzarella, monterey jack or pepper jack. Cover and refrigerate overnight if you wish.


Pass the tortilla chips and dig in. Home run! Touchdown! Goal!


Game Day Taco Dip

8 ounces cream cheese at room temperature
1 cup sour cream
zest and juice from one lime
2 tablespoons of taco seasoning(find my homemade seasoning here)

1 tomato seeded and finely chopped
1/2 green pepper finely chopped
2-3 green onions finely chopped
1/2-1 cup salsa(find my homemade salsa here)
2 cups grated cheese (I like old cheddar)

Combine the first four ingredients with an electric mixer. Spread the cream cheese mixture onto the bottom of a large dish.

Layer the veggies, salsa and grated cheese on top of the cream cheese mixture.

This dip can be prepared the day before, covered and refrigerated.

Monday, 7 April 2014

Awesome Curried Hummus

 It's just the best hummus, ever. You can't buy it this good. Tastes so fresh. You have control over how much oil and salt goes in. Really easy and quick, it makes a large amount. You can half the recipe if you would like.

I like to cook my chickpeas from dried. This is an extra step but, I think that it makes a superior product. You can purchase dried chickpeas in the 'import' section of your supermarket. They will be with the middle eastern items.


 Here's how to cook chick peas. They need to soak overnight

  1.  Put about four cups of the dried peas into a large soup pot.
  2. Cover with plenty of cold water. Make sure you have the peas covered with three or four inches of water.
  3. Cover and let them soak overnight
  4. In the morning, Drain the peas and cover with fresh water. The peas will have absorbed some water overnight.
  5. Bring it boil, reduce heat, partially cover and simmer for 1-2 hours until the peas are softened. 
  6. When they are soft, drain, and let them cool.
  7. Chickpeas freeze beautifully. I put them into a large zip-lock bag and freeze them in one layer. They will be easy to separate, so you can remove as many or as little from the bag as you like.
  8. They will keep for months in the freezer.
  9. They need about one hour to thaw or rinse them under warm water to speed up the thawing process.
Chickpeas are grown in Canada. Read the package and buy local.
Use canned chickpeas if you would like. Make sure to read the label, some brands add nasty stuff.

dried chickpeas
Lets make the hummus
  • 4 cups chickpeas or use 2 cans of chickpeas drained and rinsed.
  • 1/4 cup good quality olive oil 
  • zest and juice of one lemon( I use organic if I am going to eat the peal)
  • 1-1/2 tsp curry powder
  • 3 tbsp tahini(sesame seed paste, can substitute peanut butter)
  • 1 tsp cumin
  • 1 tsp garlic
  • 1/2 tsp salt
  • 1/2 tsp sugar(optional but balances the flavour)
  • water to make a smooth consistency
  • 1/2 bunch cilantro
Combine all, except cilantro, into a food processor. Process until smooth and fluffy( I like my hummus smooth, if you like yours chunky, process less) Add water a couple of tablespoons at a time to make it smooth. Add cilantro and process for a few minutes until the cilantro is chopped. Store in the refrigerator. The flavour will improves as it sits.

We like our hummus with raw veggies ( carrots, celery, peppers and pea pods) or pita wedges. Packed with protein and flavour. It will keep covered in the fridge for one week. A great thing to have ready in the summer for when guests pop over.


Awesome Curried Hummus